Hey guys how’s you doing today I’m hoping everything is going well, So today I’m going to discus on a matter which is related to OLM to PST file conversion because in these day I have see lots of quires regarding to OLM to PST Conversion & MS Outlook so in this blog I will give you answers for those question which I randomly picked up from Quora and other sources.
Question.Can I test the OLM to PST Converter before buying the software?
Answer:Yes, there is plenty of software’s in the market which provides demo version along with software so that user can test before buying them like- MailsMagic OLM to PST Converter.
Question:Is there a Freeware to Import Outlook OLM to PST? If not, the suggest me which paid tools I have to buy?
Answer:No, there no Freeware tool exist to import Outlook OLM to PST as per my knowledge but still if there is any Freeware OLM to PST migration tool exist then don’t use that because it may cause of your data lose. Paid tools will provide you precise conversion without any hustle and data error. I will again suggest you to go for MailsMagic OLM to PST Converter because Its a low budget Migration tool specially designed for OLM to PST conversion.
Question:Is the OLM to PST converter Freeware a good solution for a Mac to PC Outlook data transfer?
Answer:No, Its may cause of your data lose so never use a Freeware Tool for Mac to Window Outlook data transfer besides you can use manual method instead of Freeware tool.but if you don’t know the manual method here is full procedure of data migration with images.
Step 1: Setup an IMAP account though Gmail account
Open Gmail your account then tap on Gear icon on the right-hand side of Google Gmail account.

After that you have to tap on the Settings button.
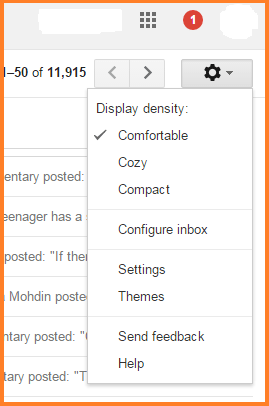
On the Settings column, you need to tap on Forwarding and POP/IMAP panel.

Then check your IMAP Access status. If its shows status is disabled then enable it now.

Once your IMAP account is create, now you need to set up your Outlook account for Mac with it., follow the steps given below for further:
Step 2: Add your IMAP mail account to Outlook for Mac
First, open Outlook on Mac, then Tap on Menu ->Tools -> Accounts.
After that, tap on Email. Here, enter an email address, password and other information which is asked. Then tap on Add Account.
Once all above process complete then check your IMAP mail account.
After that, you need to create Gmail label, In order to perform the synchronization process between Outlook for Mac and IMAP account do follow the steps given below:
Step 3: Create a Label in Gmail account
First, open your Gmail account. Then tapon Gear icon on the right-hand side of Gmail account. Then, Tap on the Settings button.
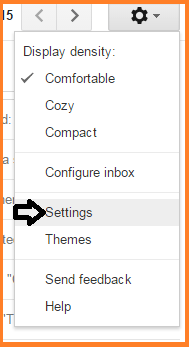
Then on the Settings tab, TapLabels

and here, now tap on Create New Label. And check Show in IMAP box is checked.

After thisyour Mac Outlook and tap on Send/Receive.
Now you will have to move emails and other mailbox data from OLM file to the IMAP mailbox folder. To follow the steps given below:
Step 4: Move or Migrated Emails from Mac Outlook to IMAP mailbox
Open Outlook Mac, the right Tap on mailbox item which you want to switch to Outlook for Windows.
Then select Move -> Copy to Folder File.
After that type the name of your IMAP folder and Tap on Copy.
Then tap on Send/Receive or refresh the folder on Gmail to update the mailbox.
Now you have to do all the copied mailbox data have been synchronized to the IMAP mailbox folder.
Once completion of above steps is done, now you need to transfer all the emails and other mailbox data from the IMAP Mailbox folder to Windows Outlook. For this, you need to set up the same IMAP mail account to the Windows Outlook.
